Searching for a complete tutorial on Python Tkinter GUI, then look no forward.
This is the best article of tkinter library on the internet. It’s the complete information about tkinter in which we have covered from basic to developer level advance.
So let’s start with the very basic.
What is Tkinter?
Tkinter is a standard library in Python that is used to create Graphical User Interface (GUI) based desktop applications. It is pronounced (Tk inter).
It is a lightweight, easy-to-manage, and one of the most used libraries for making cross-platform desktop applications that can run on Windows, macOS, and Linux. The GUIs built with Tkinter might look outdated which lack modern shine but, it is very helpful to quickly build something that’s functional and cross-platform.
What Graphical User Interface (GUI) is actually?
Started at Xerox PARC in 1981, the Graphical User Interface (GUI) has become an integral part of any computing system which requires human-machine interaction.
The User Interface (UI) is actually a way or a window through which humans interact with computers. Graphical User Interface (GUI) makes interaction more attractive by adding various graphical elements like images, buttons, cursors, menus, tools, popups, or anything which we see on the screen these days.
The opposite of GUI is CLI (Command Line Interface) where we interact with computers just by adding textual inputs. Before the coming of the GUI concept, using computers was a boring task. Imagine there are no menus and icons on your PC screen and you just see a black terminal through which you do all the computer applications entering inputs through keyboards.
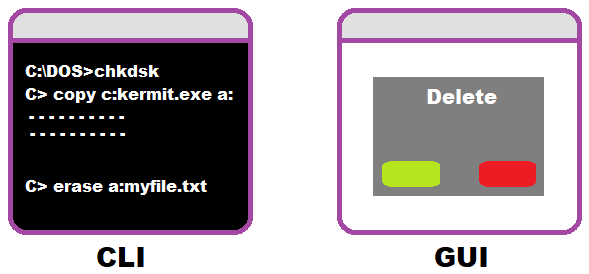
You might have heard of the olds days MS-DOS operating system by Microsoft. It was a non-GUI Operating system where all operations were done using keyboard inputs. Later with the launching of Windows OS, Microsoft introduced GUI in their System.
Desktop Applications: Desktop Applications are software and programs that run on your computer without taking the help of a browser or the internet. For example, Notepad, VLC Media Player, Antivirus Scanner, etc. Generally, C, C++, C#, Java, and Python programming are used to create desktop applications.
Similarly, Tkinter is a library that is used to create a desktop application in Python.
Libraries in Python for creating desktop applications
Not just Tkinter, there are various other libraries in Python for creating desktop applications like:
- Kivy
- PyQt5
- wxPython
- PyGUI
But programmers prefer Tkinter over other libraries as it is a quick and simple way to create desktop applications. For example, if someone has to make a simple music player desktop app, he/she better use tkinter.
Let’s start Tkinter Tutorial
Before jumping into Tkinter programming, let’s understand some basic terminology and functionality of this module.
Widgets
Widgets in Tkinter are nothing but various controls and features that it offers for making your application functional like text boxes, buttons, etc.
Some widgets that are frequently used are:
- Label
- Button
- Entry
- Frame
- ListBox
- CheckButton
- RadioButton
- Canvas
Geometry Configuration
Geometry Configurations are actually a way to organize a widget on the container. Where you want to put any particular widget in the container area is decided by this geometry manager class.
There are primarily three types of geometry manager classes:
- pack(): It is used to put the widget on the top of the container
- grid(): This will organize the widget in a table-like structure
- place(): This class is used to organize the widget at a specific position
Let’s create your first simple basic GUI with Tkinter. I hope you have Python installed on your machine. No need to install Tkinter library as it comes preinstalled with Python. If this is not the case, you can install using the command ‘pip install tk‘
from tkinter import *
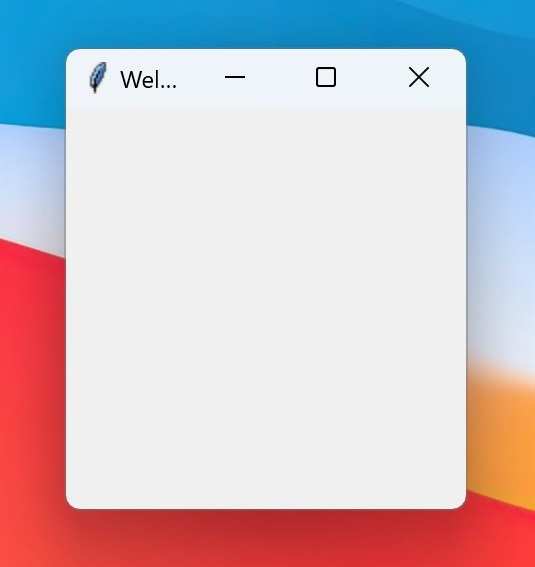
window = Tk()
window.title('Welcome to Effbot')
window.mainloop()On running the above code, it will give you a simple GUI. By default, the size of this interface is very small. You can increase the interface size by adding an extra line of dimension geometry. See the below code:
from tkinter import *
window = Tk()
window.geometry("400x400")
window.title('Welcome to Effbot')
window.mainloop()
The above code will give you a simple rectangular GUI dashboard shown below:
Don’t be confused with the red and blue colors. It is my PC screensaver.
Working with widgets and geometry configuration
Labels
The Label widget is a standard Tkinter widget used to display a text or image on the screen. The label widget uses double buffering, so you can update the contents at any time, without annoying flicker.
Syntax: l1 = Label(master, opt=val)
Options that can be parsed as arguments:
- Text
- Image
- bg
- command
- width
- height
Adding Text
from tkinter import *
window = Tk()
window.geometry("400x400")
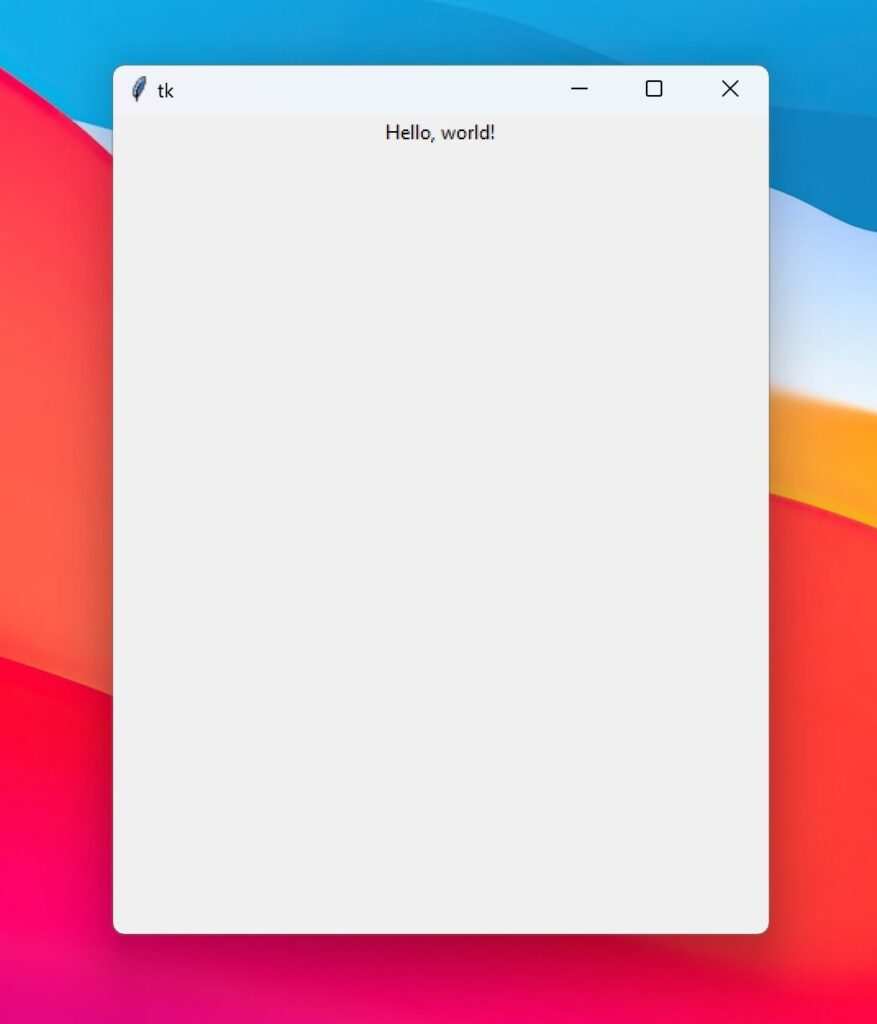
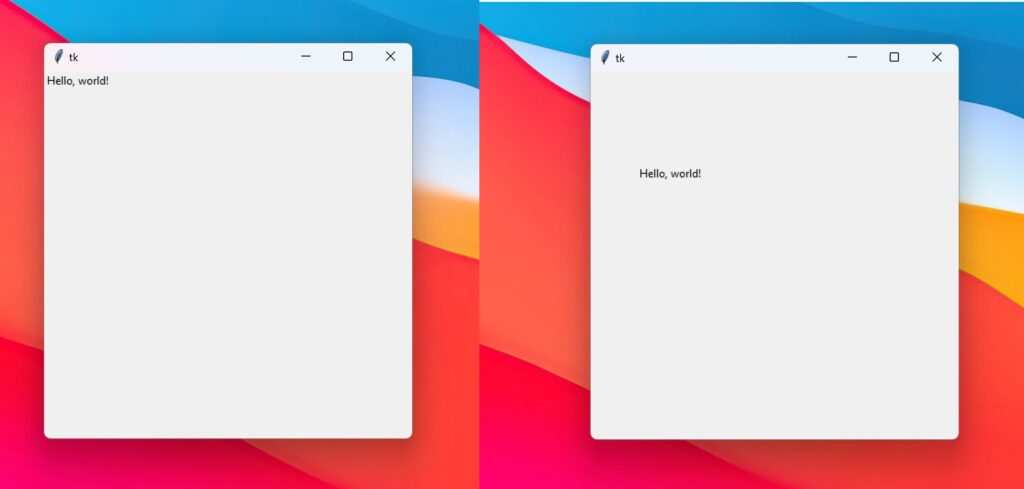
l1 = Label(window, text="Hello, world!")
l1.pack()
window.mainloop()You can see in the above code that we have not just created a ‘Label’ widget (l1) to show text but also used the ‘pack’ geometry configuration to align the text on the top. See the output below:
What would have happened if we have used ‘grid’ and ‘place’ geometry? Let’s see:
from tkinter import *
window = Tk()
window.geometry("400x400")
l1 = Label(window, text="Hello, world!")
l1.grid(row=0, cloumn=1)
window.mainloop()
from tkinter import *
window = Tk()
window.geometry("400x400")
l1 = Label(window, text="Hello, world!")
l1.place(x=15, y=20)
window.mainloop()The above two blocks of codes will show the output as:
You can specify which color to use for the label with the foreground (or fg) and background (or bg) options. You can also choose which font to use for the label and increase the width of the widgets using the code below.
l1 = Label(window, text="Helvetica", font=("Helvetica", 16), fg="red", bg="green", width=30)Adding Image
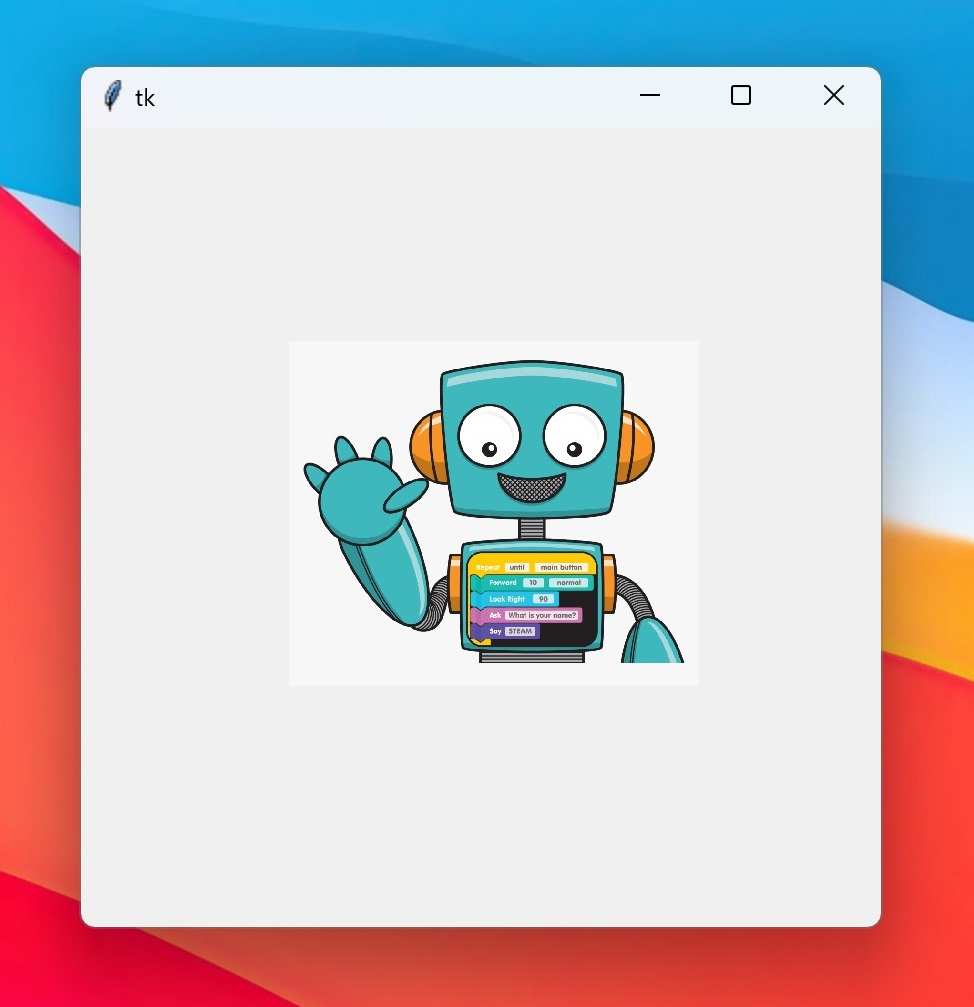
You can use the label to display PhotoImage and BitmapImage objects.
from tkinter import *
window = Tk()
window.geometry("400x400")
l1 = PhotoImage(file="filename.png")
l1 = Label(window, image=l1)
l1.pack()
window.mainloop()
The output GUI will look like the below image:
Buttons
The Button widget is a standard Tkinter widget used to implement various kinds of buttons. Buttons can contain text or images, and you can associate a Python function or method with each button. When the button is pressed, Tkinter automatically calls that function or method.
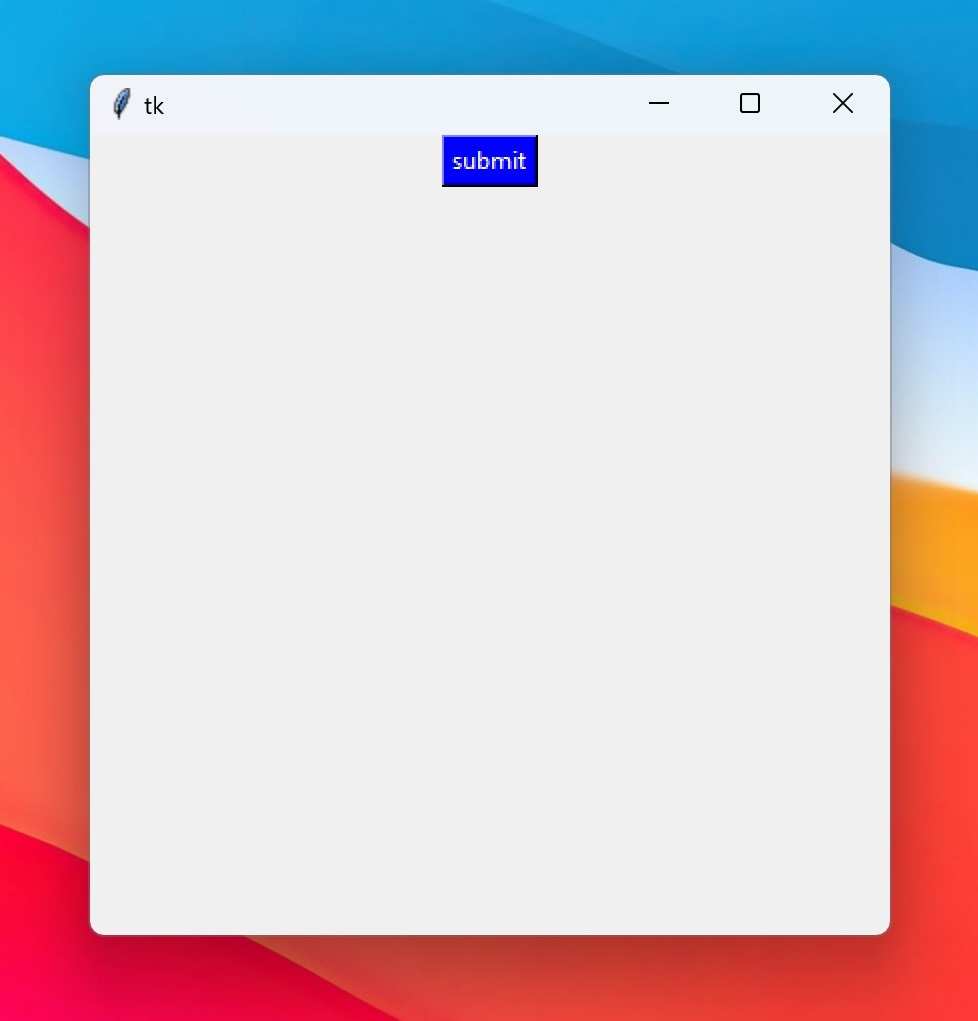
from tkinter import *
window = Tk()
window.geometry("400x400")
b1 = Button(window, text="submit", bg="blue", fg="white")
b1.pack()
window.mainloop()
The output of the above code will be the GUI with a button on its container as shown below:
A button without a callback is pretty useless; it simply doesn’t do anything when you press the button. To add the function to execute while clicking the button, you need to add the Python function as shown in the code below. You can see that we have used the ‘command’ attribute.
from tkinter import *
window = Tk()
window.geometry("400x400")

def callback():
    print "click!"

b1 = Button(window, text="SUBMIT", command=callback)
b1.pack()
window.mainloop()
Entry
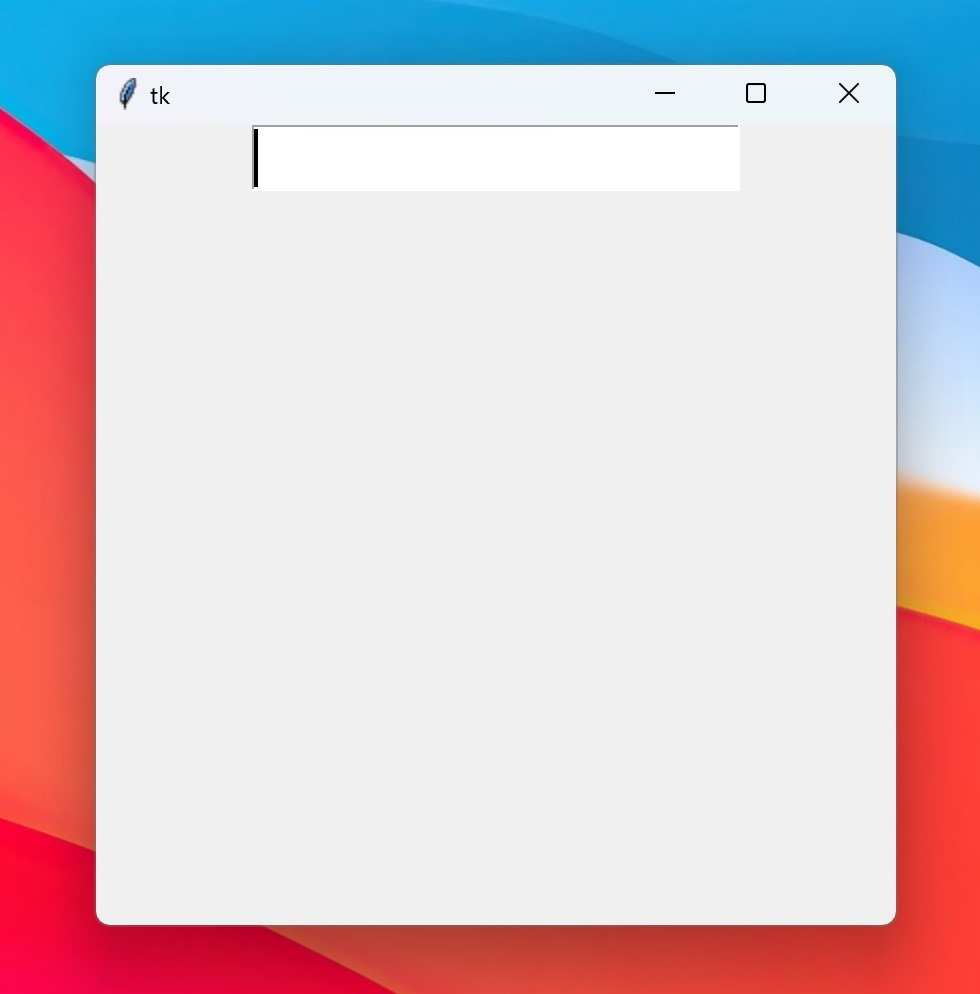
The Entry widget is a standard Tkinter widget used to enter or display a single line of text. The entry widget is used to enter text strings. This widget allows the user to enter one line of text, in a single font. To enter multiple lines of text, use the Text widget.
from tkinter import *
window = Tk()
window.geometry("400x400")
e1 = Entry(window, width=20, font=("calibri", 18))
e1.pack()
window.mainloop()
On execution, the code will give the below look:
Frame
A frame is a rectangular region on the screen. The frame widget is mainly used as a geometry master for other widgets, or to provide padding between other widgets.
Frame widgets are used to group other widgets into complex layouts. They are also used for padding, and as a base class when implementing compound widgets.
Syntax: f1 = Frame(master, opt=val)
Options can be passed as arguments:
- bg
- bd
- cursor
- width
- height
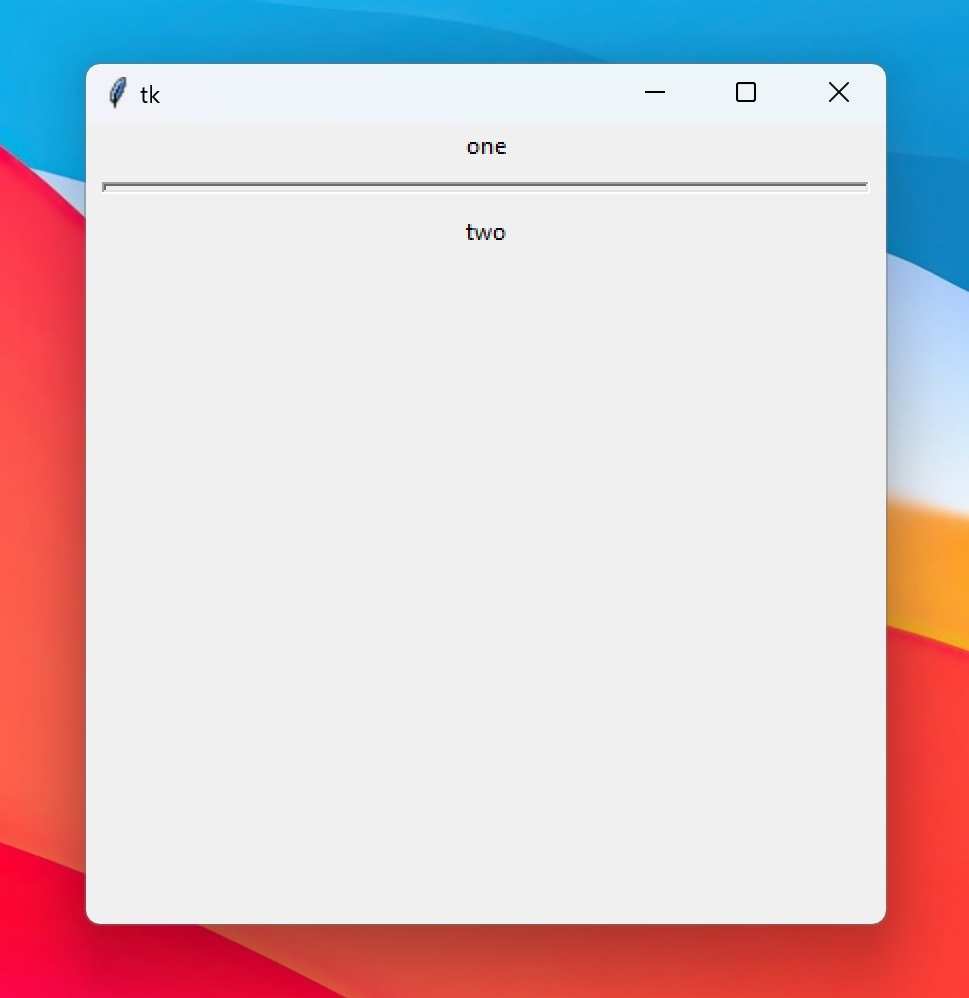
The frame widget can be used for decorations:
from tkinter import *

window = Tk()
window.geometry("400x400")

Label(text="one").pack()
separator = Frame(height=2, bd=1, relief=SUNKEN)
separator.pack(fill=X, padx=5, pady=5)
Label(text="two").pack()
window.mainloop()
The above code makes your GUI as shown below:
ListBox
The Listbox widget is a standard Tkinter widget used to display a list of alternatives. The listbox can only contain text items, and all items must have the same font and color. Depending on the widget configuration, the user can choose one or more alternatives from the list.
Listboxes are used to select from a group of textual items. Depending on how the listbox is configured, the user can select one or many items from that list.
When you first create the Listbox, it is empty. The first thing to do is usually to insert one or more lines of text. The insert method takes an index and a string to insert. An index is usually an item number (0 for the first item in the list), but you can also use some special indexes, including ACTIVE, which refers to the “active” item (set when you click on an item, or by the arrow keys), and END, which is used to append items to the list.
from tkinter import *

window = Tk()
window.geometry("400x400")

listbox = Listbox(window)
listbox.pack()


listbox.insert(END, "a list entry")

for item in ["one", "two", "three", "four"]:
    listbox.insert(END, item)

window.mainloop()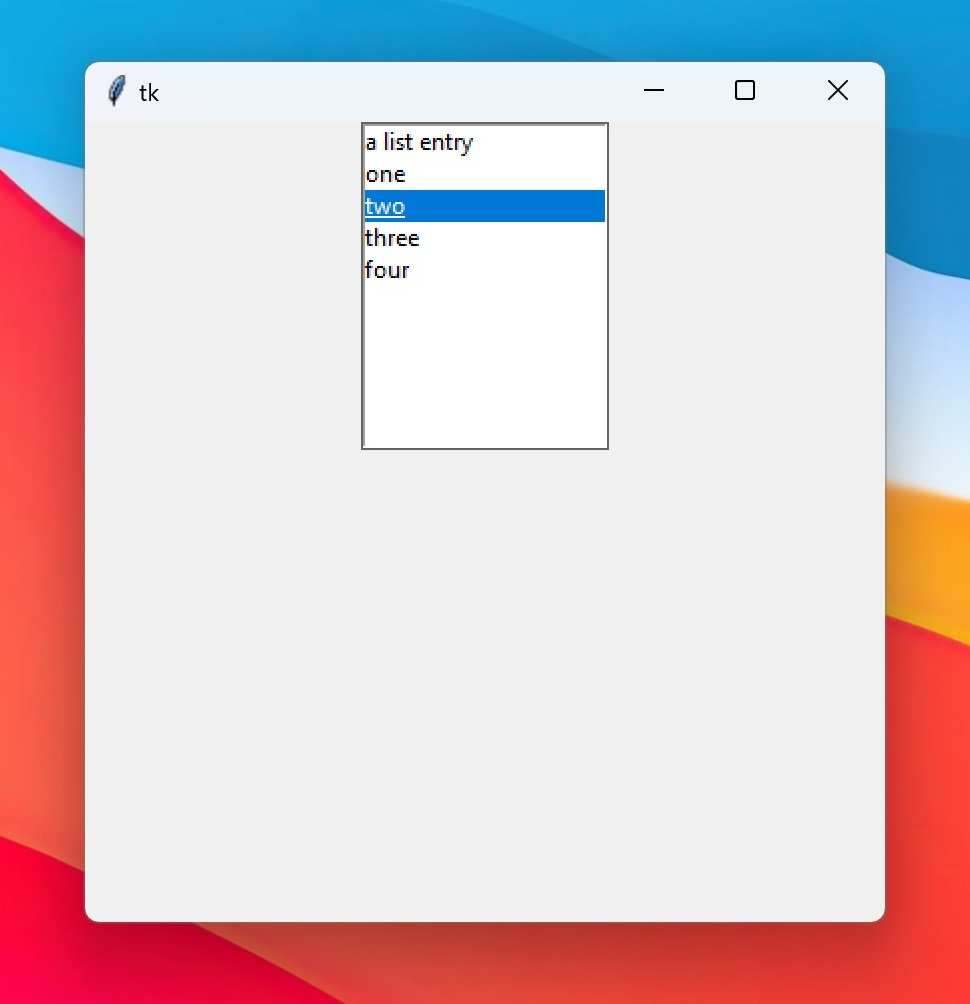
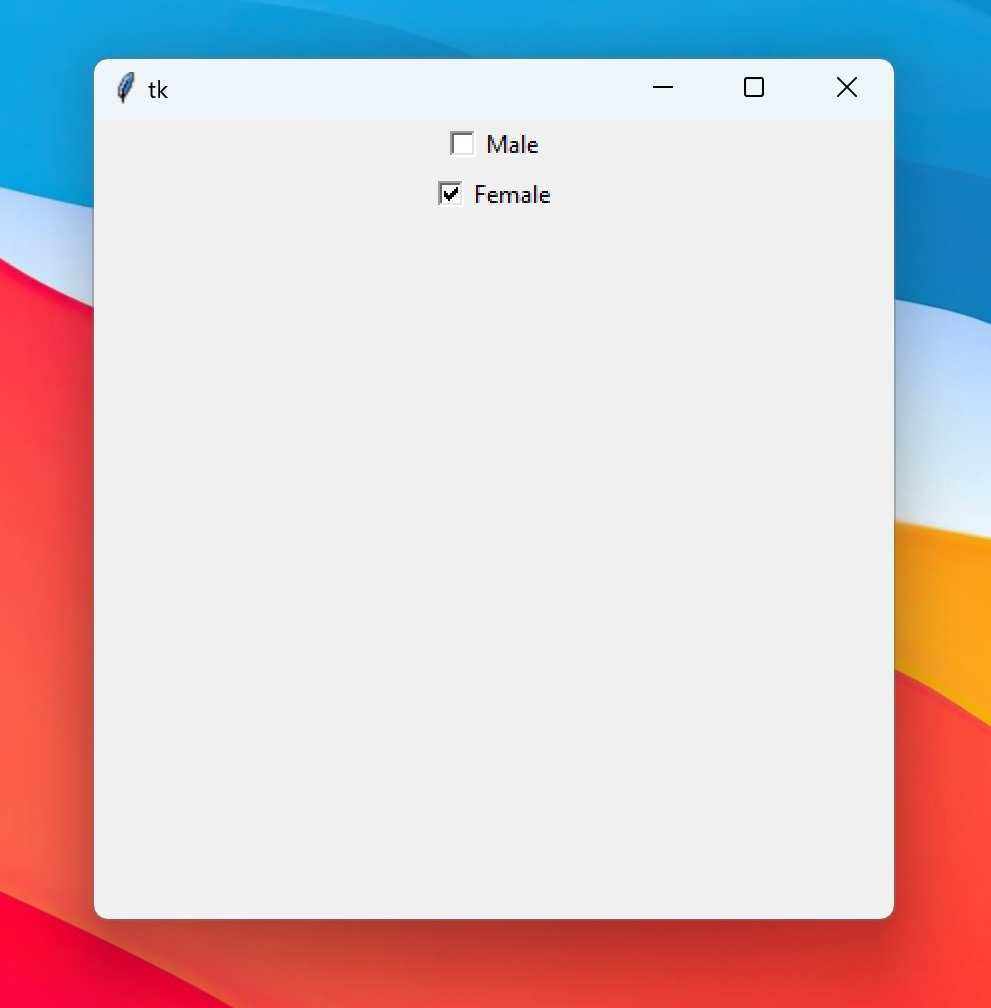
CheckButton
The Checkbutton widget is a standard Tkinter widget used to implement on-off selections. Checkbuttons can contain text or images, and you can associate a Python function or method with each button. When the button is pressed, Tkinter calls that function or method.
The checkbutton widget is used to choose between two distinct values (usually switching something on or off). Groups of checkbuttons can be used to implement “many-of-many” selections.
Syntax: cb1 = Checkbutton(master, opt=val)
Options can be passed as arguments:
- Title
- bg
- activebackground
from tkinter import *
window = Tk()
window.geometry("400x400")
cb1 = Checkbutton(window, text="Male")
cb2 = Checkbutton(window, text="Female")
cb1.pack()
cb2.pack()
window.mainloop()
Output:
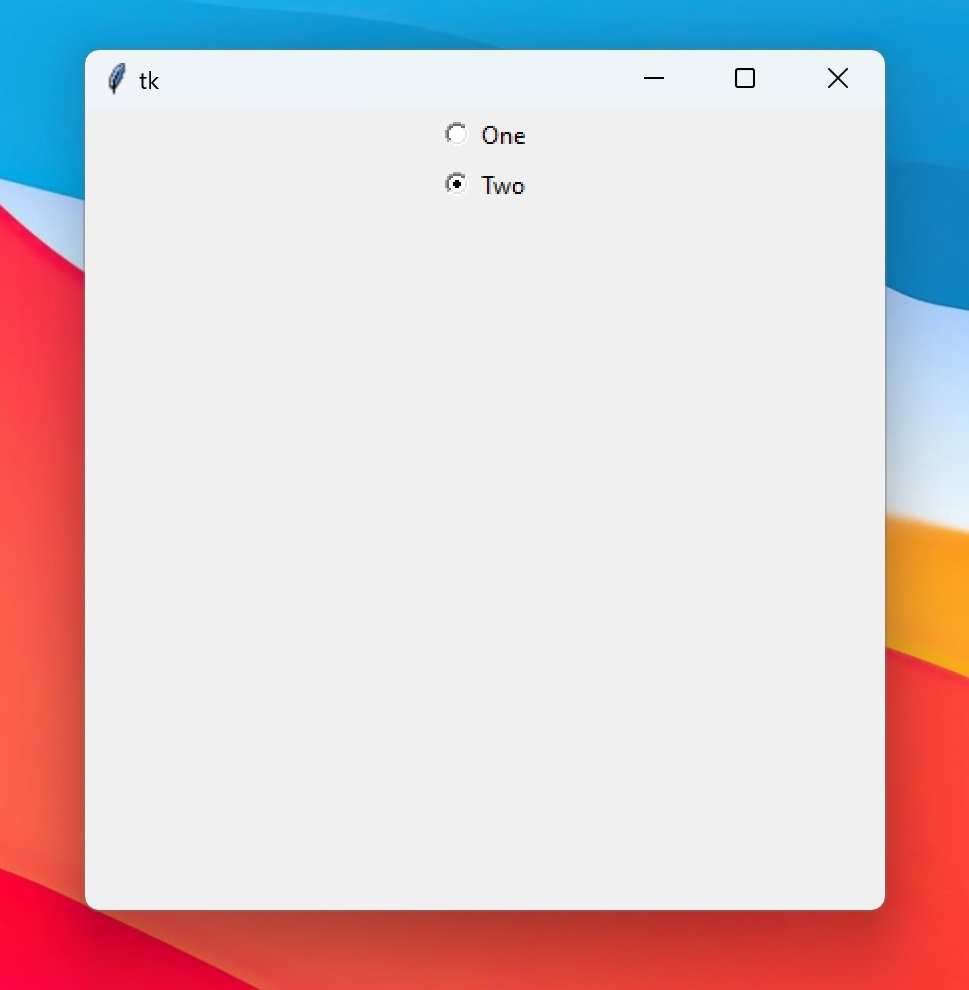
Radiobutton
The Radiobutton is a standard Tkinter widget used to implement one-of-many selections. Radiobuttons can contain text or images, and you can associate a Python function or method with each button. When the button is pressed, Tkinter automatically calls that function or method.
The radiobutton widget is used to implement one-of-many selections. It’s almost always used in groups, where all group members use the same variable.
from tkinter import *

window = Tk()
window.geometry("400x400")

v = IntVar()

rb1 = Radiobutton(window, text="One", variable=v, value=1)
rb1.pack()
rb2 = Radiobutton(window, text="Two", variable=v, value=2)
rb2.pack()
window.mainloop()
Output:
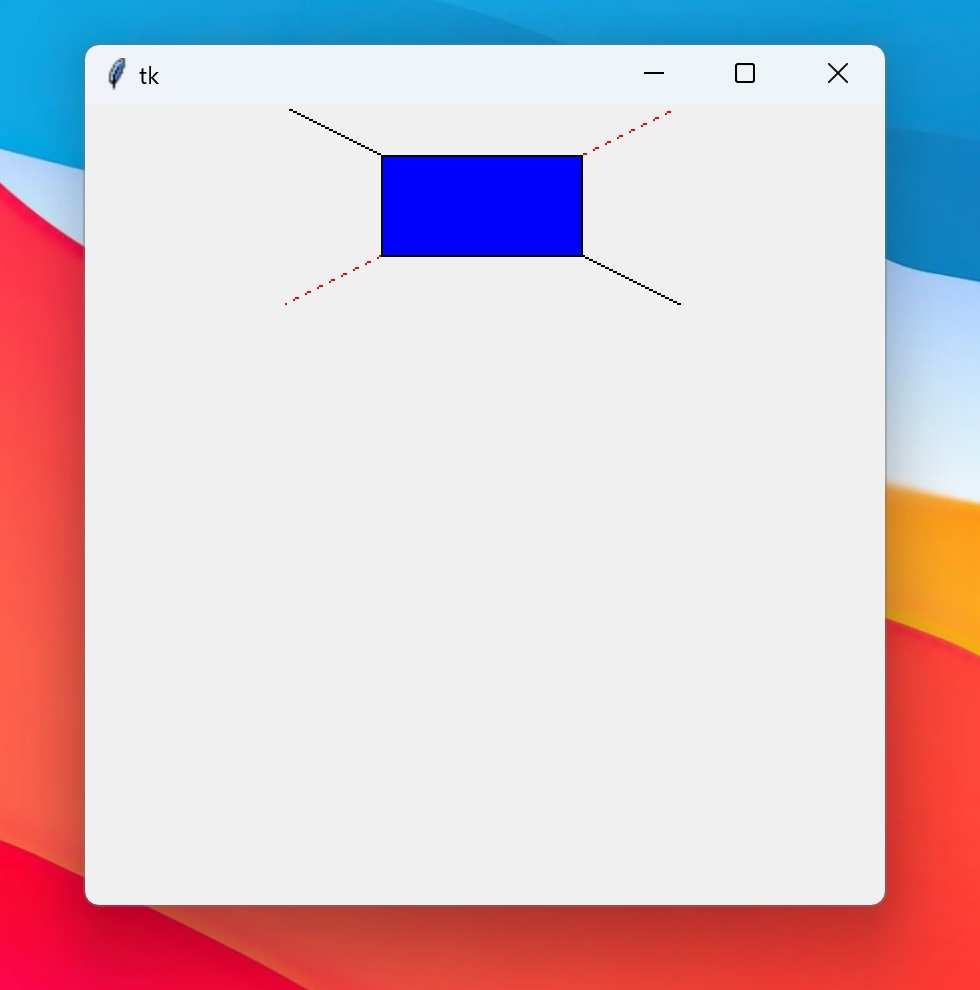
Canvas
The Canvas widget provides structured graphics facilities for Tkinter. This is a highly versatile widget that can be used to draw graphs and plots, create graphics editors, and implement various kinds of custom widgets.
The canvas is a general-purpose widget, which is typically used to display and edit graphs and other drawings.
from tkinter import *

window = Tk()
window.geometry("400x400")

ca = Canvas(window, width=200, height=100)
ca.pack()

ca.create_line(0, 0, 200, 100)
ca.create_line(0, 100, 200, 0, fill="red", dash=(4, 4))

ca.create_rectangle(50, 25, 150, 75, fill="blue")

window.mainloop()
Output:
Read more about Canvas widget
Some other widgets
There are some other widgets too that are used when necessary like the Message widget, Spinbox widget, and Scrollbar widget, etc.
Message
The Message widget is a variant of the Label, designed to display multiline messages. The message widget can wrap text, and adjust its width to maintain a given aspect ratio.
The widget can be used to display short text messages, using a single font. You can often use a plain Label instead. If you need to display text in multiple fonts, use a Text widget.
from tkinter import *

window = Tk()
window.geometry("400x400")

msg = Message(window, text="this is a message")
msg.pack()
window.mainloop()
Spinbox
The Spinbox widget is a variant of the standard Tkinter Entry widget, which can be used to select from a fixed number of values. This widget can be used instead of an ordinary Entry, in cases where the user only has a limited number of ordered values to choose from.
The spinbox behaves pretty much like an ordinary Entry widget. The main difference is that you can specify what values to allow, either as a range, or using a tuple.
from tkinter import *
window = Tk()
window.geometry("400x400")
spn = Spinbox(values=(1, 2, 4, 8))
spn.pack()
window.mainloop()
You can read more about spinbox widget tkinter here
Events and Bindings in Tkinter
Tkinter application spends most of its time inside an event loop (entered via the mainloop method). Events can come from various sources, including key presses and mouse operations by the user, and redraw events from the window manager (indirectly caused by the user, in many cases).
Tkinter provides a powerful mechanism to let you deal with events yourself. For each widget, you can bind Python functions and methods to events.
widget.bind(event, handler)
If an event matching the event description occurs in the widget, the given handler is called with an object describing the event.
Here’s a simple example:
Capturing clicks in a window
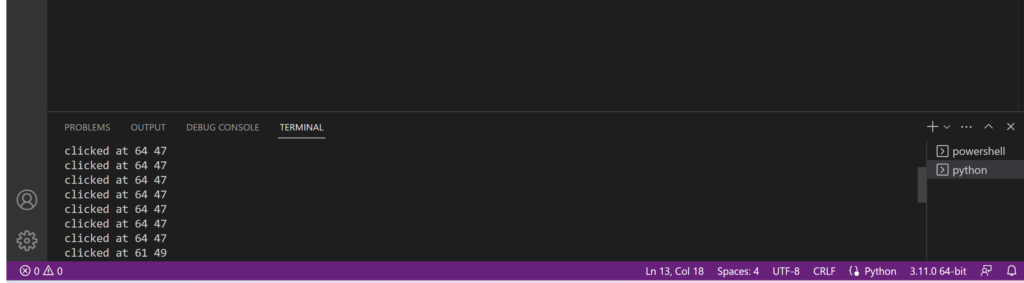
from tkinter import *

window = Tk()
window.geometry("400x400")

def callback(event):
    print("clicked at", event.x, event.y)

frame = Frame(window, width=100, height=100)
frame.bind("<Button-1>", callback)
frame.pack()

window.mainloop()
In this example, we use the bind method of the frame widget to bind a callback function to an event called <Button-1>. Run this program and click in the window that appears. Each time you click, a message like “clicked at 44 63” is printed to the console window. Below is the output screenshot in the terminal:
Read more about tkinter events and bindings
Related tkinter resources:
The Tkinter Canvas Widget
The Tkinter Spinbox Widget
Tkinter Popup Menus
A Simple Animation Engine in Tkinter
modulenotfounderror no module named ‘tkinter’
Similar Articles:
Python Basics
List, Set, Tuple, and Dictionary in Python
Python Reverse List items
Python Round() Function
Python Multiline comment
Power in Python | Python pow()
Python range() Function
Square Root in Python
Python for i in range
List of Dictionaries in Python
Try Except Python